Modification Examples
This section will show you how you can make small changes to an existing post processor. Most post processors have some variables that can be easily modified to change or activate vendor-specific robot programming features.
As an example, the following changes will be made to existing KUKA and ABB post processors:
● Generate a program with its subprograms as one file and force programs to have 3000 lines of code per program at most. Large programs will be divided into smaller programs and called sequentially.
● Set a joint movement to generate the motion command using joint angles information.
● Override the maximum speed to 500 mm/s. Even if the robot is programmed to move faster, the speed will be limited to 500 mm/s in the post processor.
The following sections show how to make the suggested changes on a text editor.
Generate all programs in one file
This example will show you how you can change the default behavior of the KUKA KRC4 post processor to generate a main program with its subprograms in the same file.
Make sure the post processor editor plug-in is enabled and follow these steps to make the post processor modifications:
1.Select Program➔Post Processor Editor.
2.Select the post processor you want to customize (KUKA KRC4).
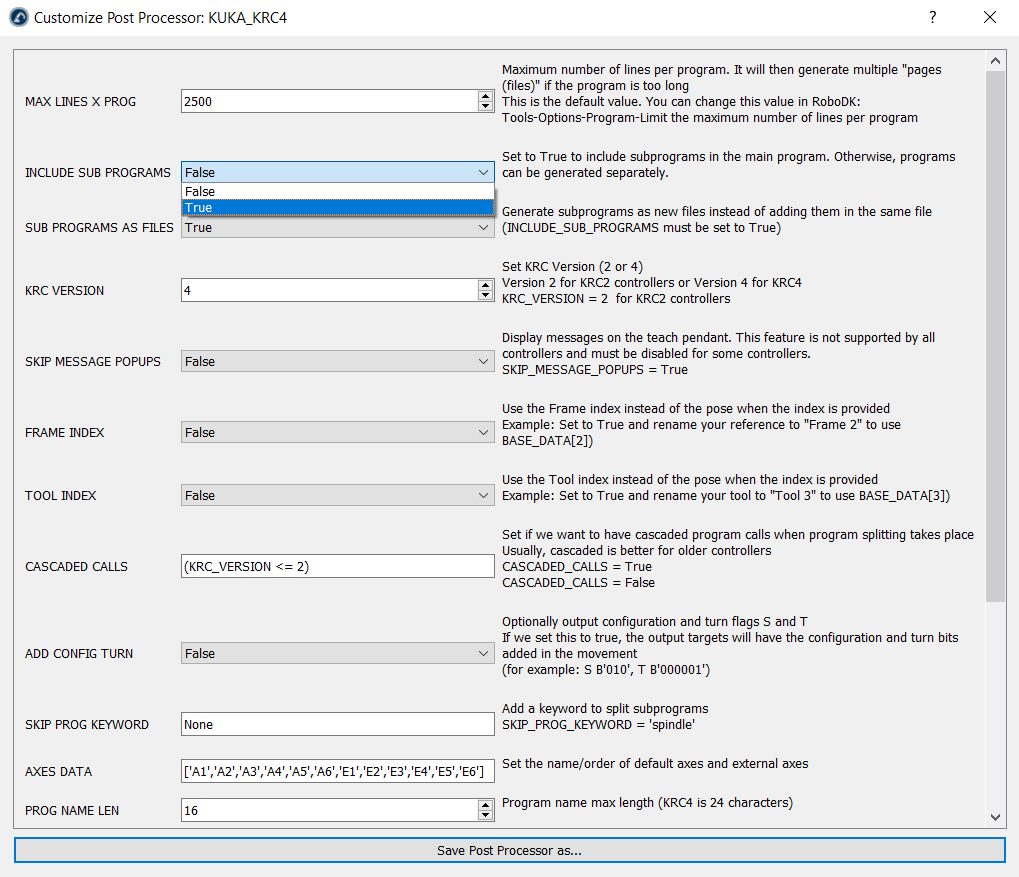
3.Select OK. A new window will open, and you’ll see the variables you can modify as shown in the following image.
4.Set the Include Sub Programs variable to True instead of False.
5.Select Save Post Processor as…
6.Enter a new name to save it (the default name uses the modification date).
You should now have a new post processor in the Posts folder of RoboDK. You can now update your project to use this new post processor by following these steps:
1.Right click your robot.
2.Select Select Post Processor.
3.Select the new post processor you created.
4.Generate your programs again to see the result.
You could also make these changes using a text editor. Follow these steps to change the default Python code of the post processor:
1.Select Program➔Add/Edit Post Processor
2.Select your post processor. For example, for KUKA KRC4 select KUKA_KRC4.
3.Select OK. The post processor will be shown in a text editor.
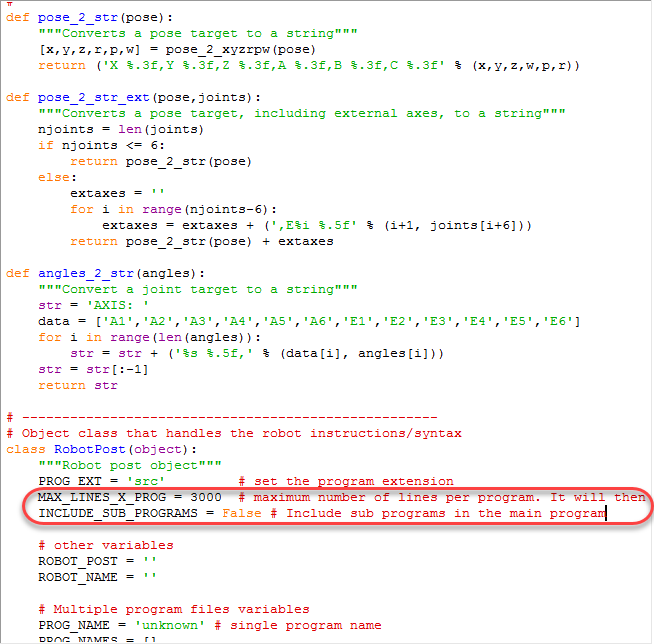
4.Set the variable MAX_LINES_X_PROG to 3000.
5.Set the variable INCLUDE_SUB_PROGRAMS to True.
Force a speed limit
This example will show you how you can impose a speed limit of 500 mm/s and avoid using higher speeds when generating a program with RoboDK.
In this example we assume we are using a KUKA KRC2 or KRC4 controller:
1.Select Program➔Add/Edit Post Processor
2.Select your post processor. For example, for KUKA KRC4 select KUKA_KRC4.
3.Select OK. The post processor will be shown in a text editor.
4.Locate the setSpeed function definition (def setSpeed)
5.Add the following line to make the maximum speed 500 mm/s. The line needs to be added before generating the $VEL.CP output which will change the speed in m/s:
speed_mms = min(speed_mms, 500)

Custom filter for frames
This section shows how you can customize setting the reference frame of an existing post processor. For example, setting a custom reference frame for a KUKA robot.
You can use compiled post processors and easily reimplement only necessary functions (for example, setFrame setTool or setSpeed).
In this example, we assume that we want to customize how the base is defined for a KUKA controller. For example, if you want to output the following line when setting the reference frame:
BASE_DATA[8] = {FRAME: X:2000, Y:0, Z:0, A:0, B:0, C:0}
BAS (#BASE,8)
You simply need to create a new file called KUKA_Custom_Post.py in the C:/RoboDK/Posts/ folder with this the following few lines, which uses the default KUKA_KRC2 post processor and overrides setting the reference frame (setFrame function):
from KUKA_KRC2 import RobotPost as MainPost
class RobotPost(MainPost):
def setFrame(self, pose, frame_id, frame_name):
"""Change the robot reference frame"""
self.addline('; BASE_DATA[8] = {FRAME: %s}' % (self.pose_2_str(pose)))
self.addline('BAS (#BASE,8)')
However, we could add custom filters based on certain criteria to filter between using the default behavior and using a custom implementation. The post processor file could then be modified as follows:
from KUKA_KRC2 import RobotPost as MainPost
class RobotPost(MainPost):
def setFrame(self, pose, frame_id, frame_name):
"""Change the robot reference frame"""
if frame_name == "Frame 4": # Enter any condition here
# Trigger the call to the default method (same as not overriding the function)
super(MainPost, self).setFrame(pose, frame_id, frame_name)
return
# Implement a custom setFrame
self.addline('; ---- Setting reference: %s ----' % frame_name)
self.addline('; BASE_DATA[8] = {FRAME: %s}' % (self.pose_2_str(pose)))
self.addline('BAS (#BASE,8)')
self.addline('; --------------------------')
When you generate programs for KUKA KRC controllers, there are many ways you can set your coordinate system or reference frame. The following definition of setFrame shows an alternative implementation with different options:
def setFrame(self, pose, frame_id, frame_name):
"""Change the robot reference frame"""
self.addline('; ---- Setting reference: %s ----' % frame_name)
# option 1: Build the kinematics based on the MACHINE_DEF array and the provided offset
#self.addline('$BASE = EK (MACHINE_DEF[2].ROOT, MACHINE_DEF[2].MECH_TYPE, { %s })' % self.pose_2_str(pose))
# option 2: Build the kinematics based on the EX_AX_DATA array and the provided offset
#self.addline('$BASE=EK(EX_AX_DATA[1].ROOT,EX_AX_DATA[1].EX_KIN, { %s })' % self.pose_2_str(pose))
# Option 3: Build the kinematics based on the EX_AX_DATA array and the pre-defined offset
#self.addline('; Using external axes')
#self.addline('; $BASE=EK(EX_AX_DATA[1].ROOT,EX_AX_DATA[1].EX_KIN,EX_AX_DATA[1].OFFSET)')
#self.addline('; $ACT_EX_AX= %i' % (self.nAxes - 6))
# Option 4: Use the BAS(#ex_BASE) init function from the BAS.src file
#self.addline('; BASE_DATA[%i] = {FRAME: %s}' % (self.BASE_ID, self.pose_2_str(pose)))
#self.addline('BAS(#ex_BASE,%i)' % self.BASE_ID)
# Option 5: Use the BAS(#BASE) init function from the BAS.src file
self.addline('; BASE_DATA[%i] = {FRAME: %s}' % (self.BASE_ID, self.pose_2_str(pose)))
self.addline('BAS (#BASE,%i)' % self.BASE_ID)
# Option 6: Directly take the base from the BASE_DATA array (usually what the BAS(#BASE) does)
# self.addline('$BASE=BASE_DATA[%i]' % self.BASE_ID)
self.addline('; --------------------------')
Impose a movement using joint angles
This section will show you how you can modify an existing post processor to force an axial movement using joint values instead of Cartesian values.
In this example we’ll apply this change to an ABB IRC5 robot controller.
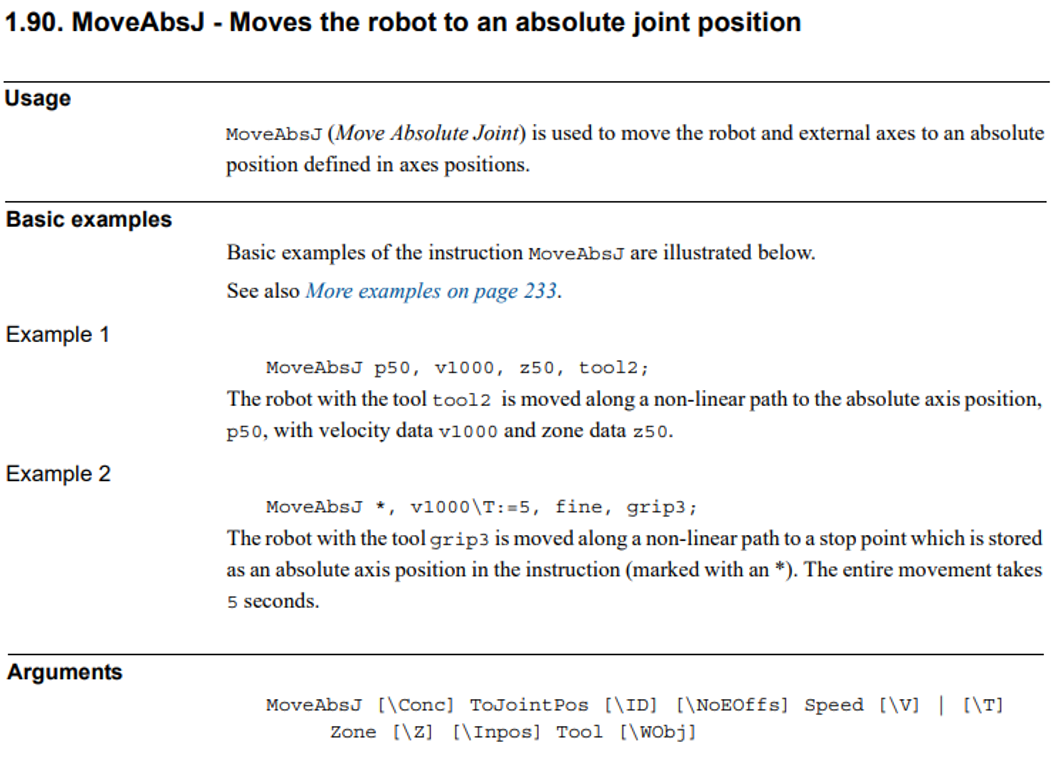
1.Find the programming manual of your robot controller. In this example we use the ABB IRC5 RAPID programming manual.
2.Look for the joint movement instructions. In this case, ABB’s absolute joint movement command is called MoveAbsJ. This command requires a jointtarget variable that defines the joint axes.
3.Select Program➔Add/Edit Post Processor and select the post processor you are currently using to modify it. If you are currently using a customizable post processor it will be selected by default.
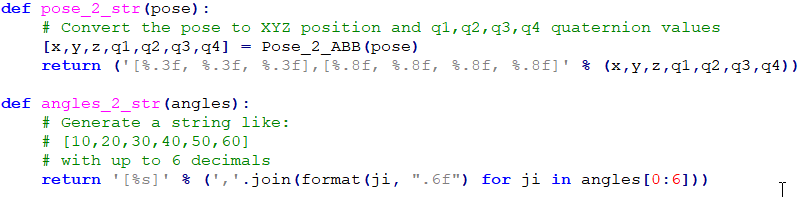
4.You should look for the MoveJ function inside the post processor. This function defines the way post processors generate the joint motion commands. Alternatively, RoboDK uses MoveL for linear movements. Using Python programming language, modify the line that is added to the program file to provide joint angle information, as shown in the following image.

5.Finally, you may need to modify the way the post processor converts the joint angles or the pose to a string. The functions angles_2_str and pose_2_str define how the joint angles and a pose, respectively, is converted to text.
Most RoboDK post processors use joint data for joint movements and Cartesian coordinates for linear movements. It is recommended to always start the first point in a sequence of linear movements as a joint movement, specifying joint coordinates. This avoids starting a program with the wrong robot configuration and reaching a singularity or axis limits.