Add-ins
A RoboDK Add-in is a custom extension to RoboDK Software that allows you to customize the user interface for specific operations or manufacturing applications. Add-ins can be easily created by third-party developers to add new functionality to the RoboDK software.
RoboDK Add-ins allow you to customize RoboDK software to automate tasks for specific applications.
Add-ins are software plugins that extend the functionality of RoboDK by providing additional tools, features, or capabilities. Some examples of RoboDK add-ins include:
1.User-defined scripts to automate repetitive tasks.
2.Additional simulation features or libraries (Plugins as libraries).
3.Apps that integrate with other software tools or hardware devices.
Add-ins are developed using the RoboDK API, which provides a set of functions and classes that can be used to interact with the RoboDK software. The API is available in several programming languages, including Python, C++, C#, and MATLAB.
Once an add-in is created, it can be installed in RoboDK and accessed from the main user interface or through custom menus or buttons. This allows users to customize RoboDK to their specific needs and workflows, and to automate complex tasks or processes.
Add-in Manager
The Add-in Manager is a tool within RoboDK that allows users to install, manage, and configure RoboDK add-ins. In fact, the Add-in Manager is a RoboDK add-in itself!
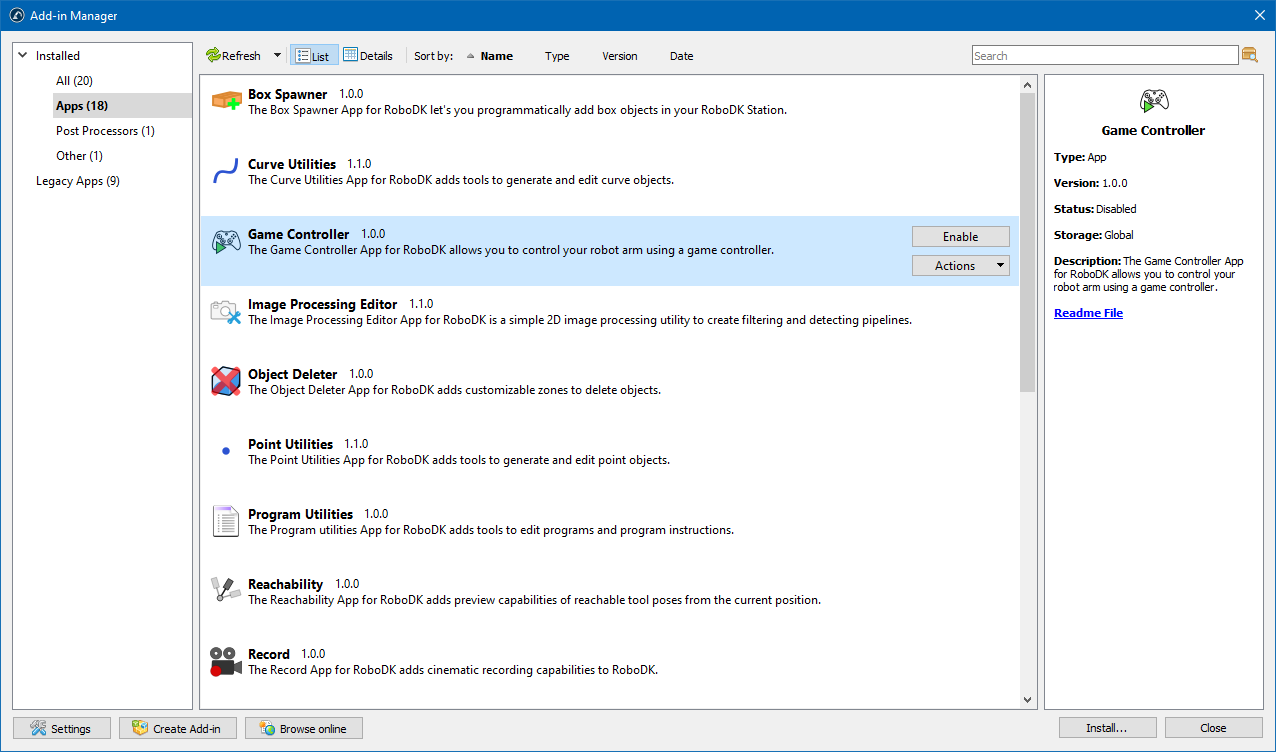
The Add-in Manager simplifies the process of installing, updating and exporting add-ins by providing a complete user interface where users can browse available add-ins, enable or disable them, manage dependencies, view detailed information about each add-in, and package them for deployment.
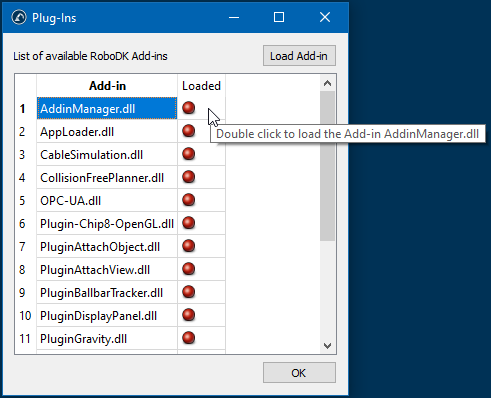
To use the Add-in Manager you must first enable the Add-in Manager plugin in the RoboDK settings:
1.Select Tools➔Add-ins (Shift+I)
2.Enable the Add-in manager plugin if it is not enabled.
3.Select Tools➔Add-in Manager (Shift+A)
User Interface
The Add-in Manager window contains five key areas:
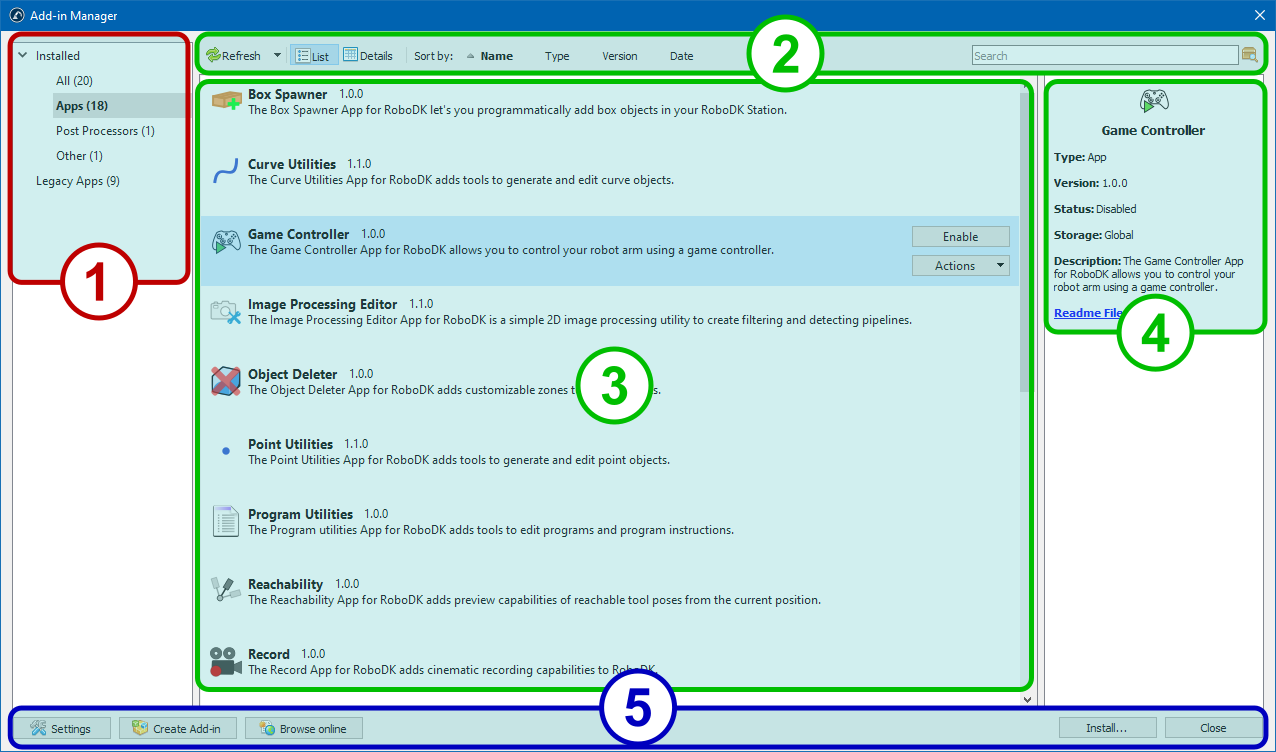
1.The left pane categorizes add-ins by type (Apps, Post Processors, Robot Drivers, etc.). It's designed to let you find your favorite add-ins more easily.
2.The upper toolbar is intended for controlling the modes of displaying the list of add-ins, sorting and searching for add-ins by name or description. It also contains a button to update the list of installed add-ons or instantly disable all of them.

3.The main area displays add-ins as a list or a table (the details view).
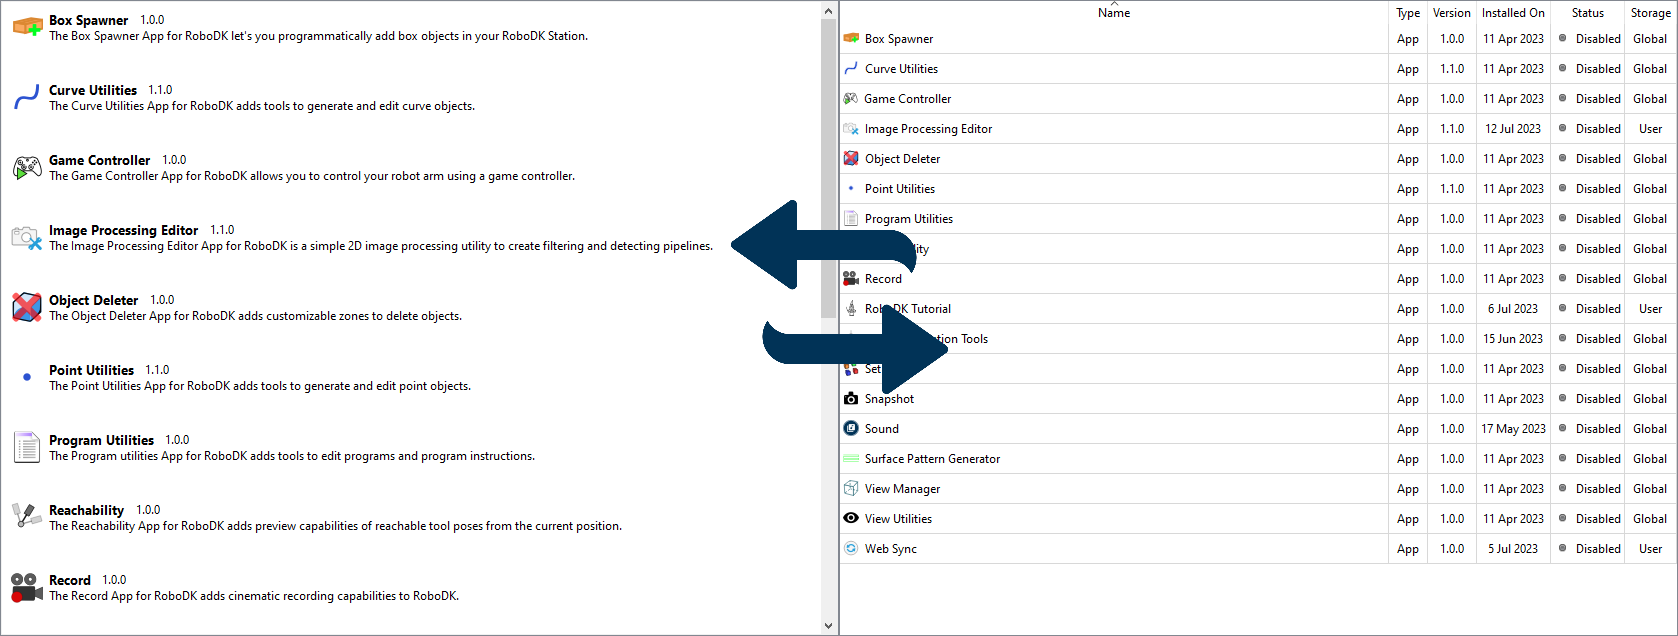
4.The description area contains information about the type of selected add-in, its current status and location, a description and a link to documentation.
5.The lower panel contains the buttons for performing auxiliary functions: opening the Add-in Manager settings, running the Add-in Creator, opening the RoboDK Add-in Marketplace, installing a new add-in or closing the window.
Managing add-ins
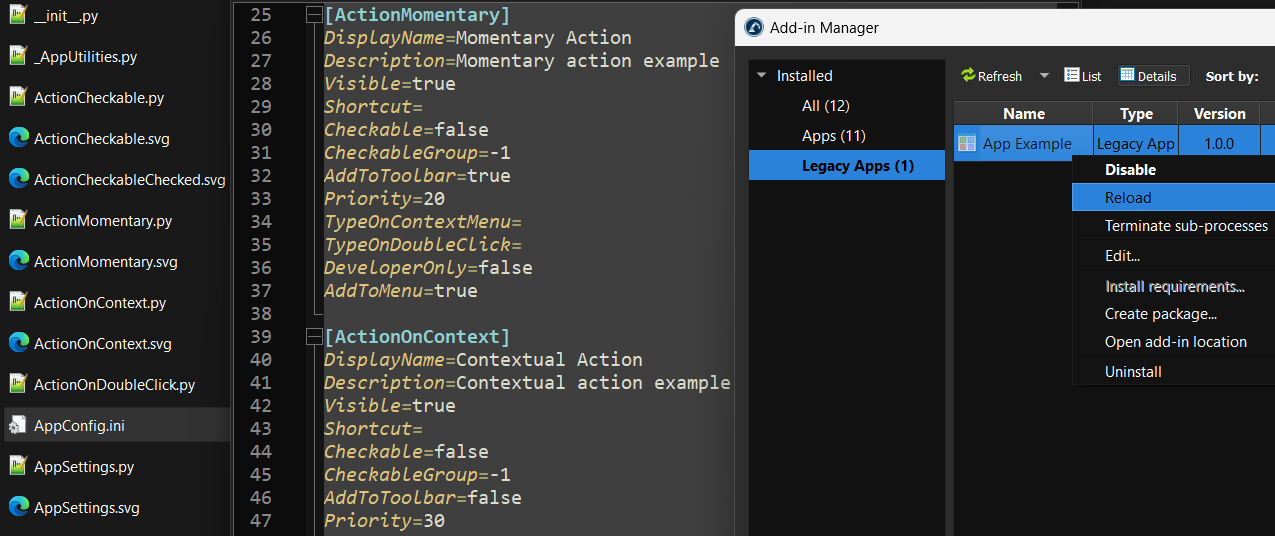
An individual add-in is managed using the context menu, which can be called by right-clicking on the selected add-in in the list or table. In the list mode you can also press the Actions button to call the context menu.
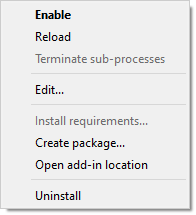
● Enable/Disable: enables or disables the add-in. The analog of this menu item is the Enable/Disable button in list mode or double-click in table mode.
● Reload: forces the Add-in Manager to re-read all configuration files (manifests) of the add-in. This is useful in rare cases when the files of the add-in have been modified on disk.
● Terminate sub-processes: terminates all running applications belonging to the add-in. This function is only available for add-ins of type App.
● Edit...: loads the add-in assets and the manifest into the Add-in Creator to create a derivative version of the add-in.
● Install requirements...: installs additional modules for add-ins of the App type. This menu item allows you to start the process of automatically installing the required modules in case you refused to do so when installing the add-in.
● Create package...: opens the Add-in Creator wizard to create a RoboDK package (.rdkp file) from an existing Legacy App.
● Open add-in location: opens an explorer window in the folder where the add-in files are located.
● Uninstall: disables the add-in and completely removes it from the disk.
Installing new add-in
Installing a new add-in is done by clicking the Install... button on the bottom panel and then searching for the .rdkp file on disk. It can also be done by drag-and-dropping the file from a folder to the Add-in Manager window.

Before installing the add-in, the Add-in Manager will ask you for the desired location of the add-in.
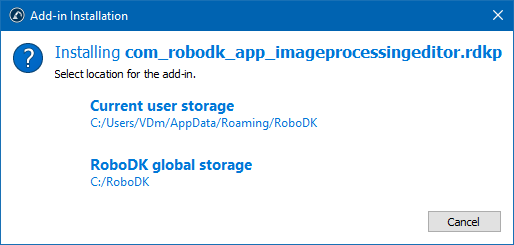
● Current user storage installs the add-in to one of the folders of the current user running on the system. This option is useful if the add-in should be available to only one user or if the current user has insufficient access rights to install add-ins to the RoboDK folder.
● RoboDK global storage installs the add-in to the main program folder. In this case, the add-on will be available to all users working on the computer. An attempt to install to the global storage may fail if the current user does not have write permissions to the RoboDK folder.
Plug-in Interface
The RoboDK Plug-In Interface is an API that allows users to create custom plug-ins for RoboDK using the C++ programming language and Qt libraries.
The Plug-In Interface provides a set of C++ classes and functions that can be used to interact with RoboDK, including the ability to create custom menus, toolbars, and dialog boxes, and to extend the functionality of RoboDK by adding new tools, features, or capabilities.
Developers can use the Plug-In Interface to create plugins that integrate with other software tools or hardware devices, or to automate complex tasks or processes within RoboDK. Plugins can be compiled as dynamic-link libraries (DLLs) that can be loaded into RoboDK at runtime, allowing for easy installation and distribution.
Overall, the RoboDK Plug-In Interface in C++ provides a powerful and flexible way for developers to extend and customize the functionality of RoboDK to their specific needs and workflows.
Apps
RoboDK Apps are a type of add-in that is designed to provide a specific set of functionality or workflow that can be easily customized and shared to customize the RoboDK user interface for specific purposes.
For example, a RoboDK App might be designed to generate a specific type of robot program, or to interface with specific hardware or software.
RoboDK Apps are typically Python scripts that use RoboDK Python API and are packaged as standalone files (rdkp files). Apps (Add-ins) can be easily shared among different computers. Once installed, RoboDK Apps can be accessed from the main toolbar or from custom menus or buttons within the RoboDK user interface.
RoboDK Apps can be developed by anyone using the RoboDK API and can be distributed or shared to other RoboDK users. This makes it easy for users to discover and install new Apps, and for developers to reach a wider audience with their custom tools and workflows.
Create your RoboDK App
Apps are the easiest way to customize the RoboDK UI for specific applications. You can easily create your own app from one or more Python scripts, this allows you to customize the toolbar and automate certain tasks within RoboDK software.
Follow these steps to create your App:
1.Take the App template or any App example from the RoboDK Plugin repository on github and create a new folder on your computer.
2.Modify, add, or remove the scripts you want to use as actions for your app. Each script will be automatically recognized as a new action and will appear on the toolbar (unless the script file starts with underscore).
3.You can optionally add icons with matching file names. Supported icon formats include PNG, SVG and JPG. You can also add or customize the icons later.
From this point forward you can use the user interface by selecting Create Add-in at the bottom of the Add-in manager, selecting the add-in folder you created and follow the instructions.
Alternatively, you can configure the App manually by renaming the files and customizing the AppConfig.ini file:
4.Place your App in this folder: C:/RoboDK/Apps/
5.Open the Add-in Manager and select the Legacy Apps tab.
6.Click on Refresh if you don’t see your App listed.
7.Double click on your App to enable it and see it in the RoboDK user interface. This will automatically create an AppConfig.ini file in the folder of your App.
8.Modify the AppConfig.ini file to customize how your app integrates with the RoboDK UI. Each script is automatically detected as an action (unless it starts with an underscore). All actions are placed in a new entry in the RoboDK menu and the toolbar by default. You can customize if you want to see each action/script in the menu, the toolbar and/or as a context menu option for one or more items.
9.Right click on you App and select Reload to see your changes reflected in the RoboDK UI.
10.Finally, you can pack your App as an RDKP Add-in by selecting Create package… and follow the instructions. You can optionally choose to compile the code of your App.
You can install this App/Add-in on any computer with RoboDK by opening this RDKP file with RoboDK.
Add-in Creator
The Add-in Creator allows you to easily create and modify RoboDK Add-in packages. The Add-in Creator tool is part of the Add-in Manager
The Add-in Creator can be opened by selecting Tools-Add-in Managerby and clicking on the Create Add-in button at the bottom of the Add-in Manager.
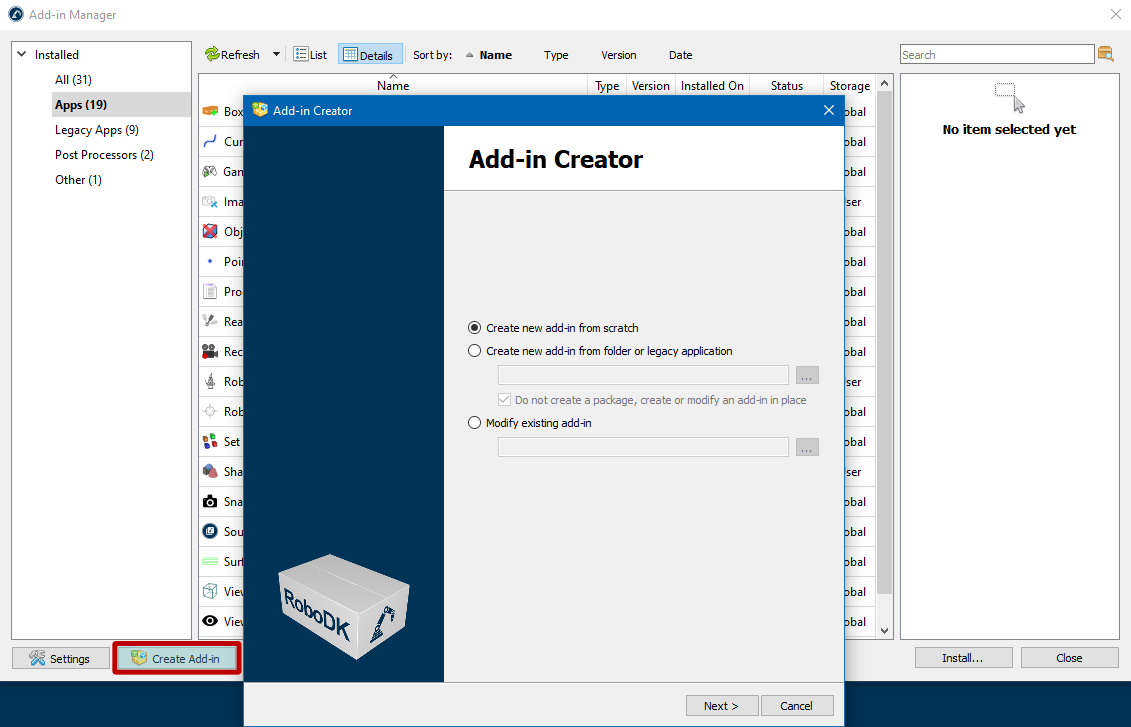
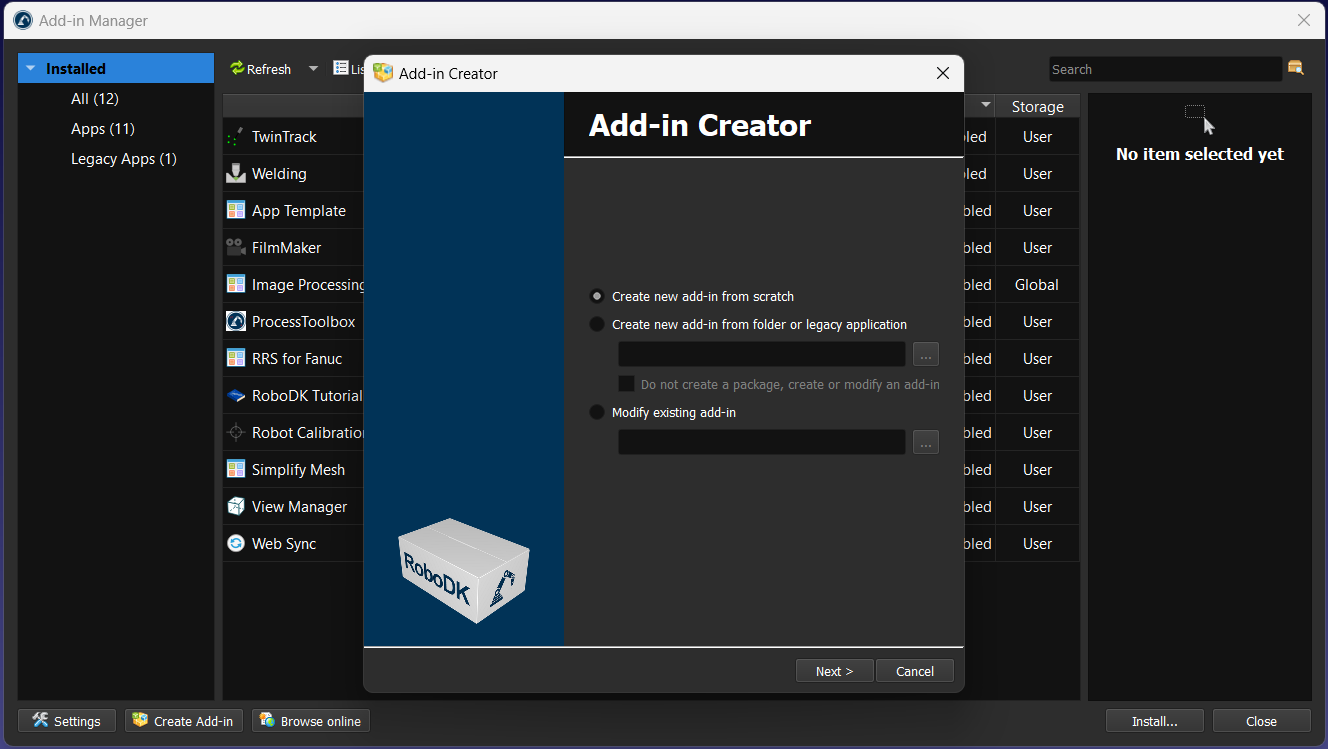
When you open the Add-in Creator wizard you can choose among the following options:
● Create new add-in from scratch: this will result in a new RoboDK package (RDKP file).
● Create new add-in from folder or legacy application: in this case you can specify the path to the folder where the files of your add-in are located. The Do not create a package option allows you to edit an add-in directly in the folder where it resides without creating a RoboDK package (RDKP file).
● Modify existing add-in: opens an existing RoboDK package to modify and create a new version.
Creating or editing Add-ins
You can easily create a new Add-in by entering basic information such as type, name, author information, etc.

In the Add-on Creator window, you’ll find mandatory fields in bold. There are five of them in total:
1.Type: The type of your Add-in, such as App, Robot Driver, Language, etc.
2.Name: The name of your add-in.
3.Unique Identifier: a unique identifier that belongs to this specific add-on. The checkbox next to this field allows you to activate the edit mode and set an arbitrary identifier, which can contain Latin letters, numbers and additional characters such as minus sign, dot, underscore.
domain.company.type.name. Although it is possible to use a different form of identifier, we recommend following the suggested format.4.Version: The version should be written in semantic versioning format (major.minor.patch).
5.Revision: The number of changes of the add-in, it takes numeric values from 1 and higher.
The remaining fields are optional, but allow you to give a more precise description of the add-in:
6.Author: The author's first and last name, or the name of your company or team (if there are multiple authors).
7.Company: The company name.
8.Language: The language used in the add-in. All languages from the IETF BCP 47 standard are listed.
9.Content Status: Status of the add-in, e.g. Final, Internal Testing, Beta, etc.
10.Description: Brief description of the add-in.
11.Modified by: This field can be used when someone modifies another author's add-in and wants to be mentioned as the author of the modifications.
12.Created: Date of creation of the first version of the add-in (to be filled in automatically).
13.Modified: Date of modification of the add-in (to be filled in automatically).
14.Email: E-mail address for sales, support or feedback purposes.
15.Website: The website of your company (developer of the Add-in).
16.Documentation Link: Link to the documentation of your Add-in.
17.Repository Link: For open-source Add-ins, a link to the GitHub repository or other public repository where the add-in is located.
18.Keywords: A list of keywords (tags) to simplify searching for the add-in in the Add-in Marketplace.
Adding assets to your Add-in
Add-in should contain one or more assets. Assets can be scripts and icons that will define the actions of your add-in.
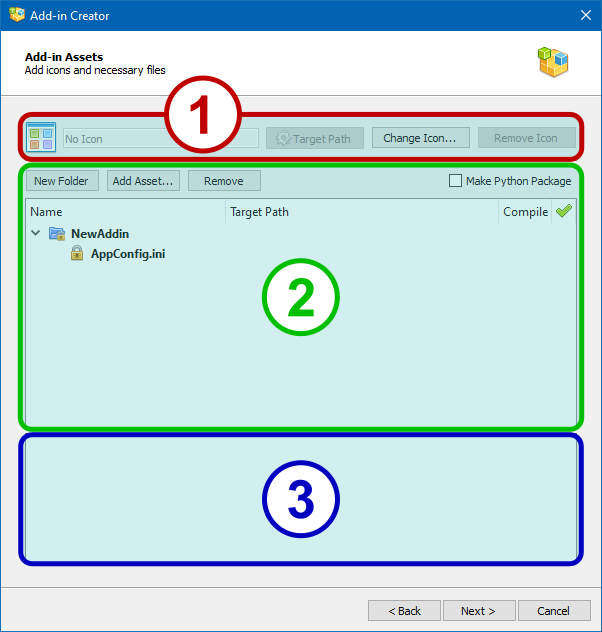
The Add-in Assets page is divided into three functional areas:
1.Package icon selection area.
2.File tree area.
3.Preview area for file contents.
The purpose of the buttons and the checkbox on this page:
● The TargetPath: Target Path button opens the properties window for the current icon file and allows you to set the target property (see the corresponding section on package internals).
● The Change icon… button allows you to replace the current package icon with a new one.
● The Remove Icon button deletes the current icon of the package and sets the default icon that corresponds to the type of the package being created.
● The New Folder button creates a new subfolder in the selected branch of the file tree.
● The Add Asset... button adds new files to the selected branch of the file tree.
● The Remove button removes the selected items from the file tree, except those that are locked.
● The Make Python Package checkbox adds the __init__.py file to the project so that the Python interpreter can use the project files as an externally loadable module.
Python scripts can be marked up for later compilation into files with a .pyc extension. The compilation process will be displayed on the next page of the wizard.
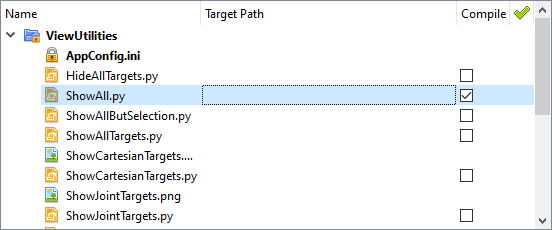
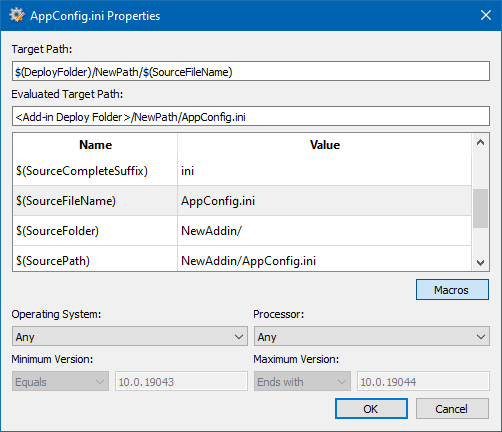
The Target Path field allows you to set the target property for each file. This can be done either manually, by typing the desired path and variable names, or by invoking the properties window when you click the gear button on the Target Path:

The file properties dialog box allows you to set the values of the target property and offers a convenient list of available variables. It also allows you to define the parameters of the target platform (OS type and version, CPU model) on which the file will be deployed.
Compiling Python scripts
The Python Compilation page will be opened if at least one Python script was selected for when you added your Add-in assets.
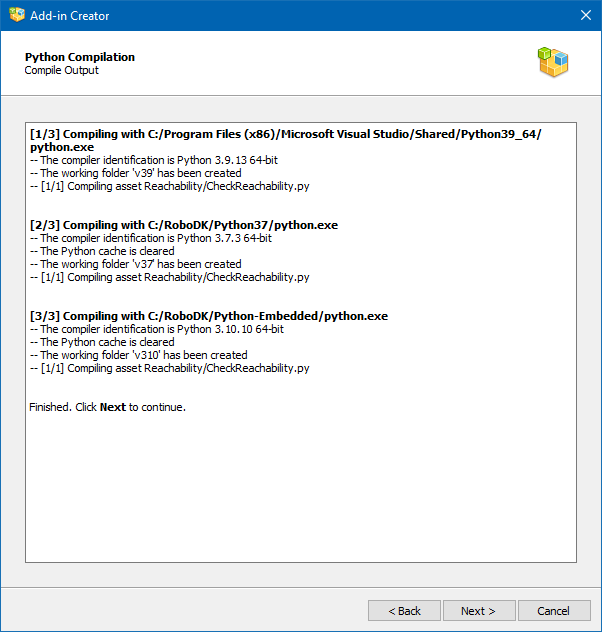
Compilation will be performed by all available Python interpreters. The list of available and used interpreters can be edited in the Add-in Manager Settings window. The compilation process itself requires no user intervention, and the page displays a detailed compilation log to catch potential problems.
App configuration
The App Configuration page allows you to customize how your actions or scripts are linked from the RoboDK user interface (menu and toolbar). You’ll see the App Configuration window if you are creating an Add-in of type App.
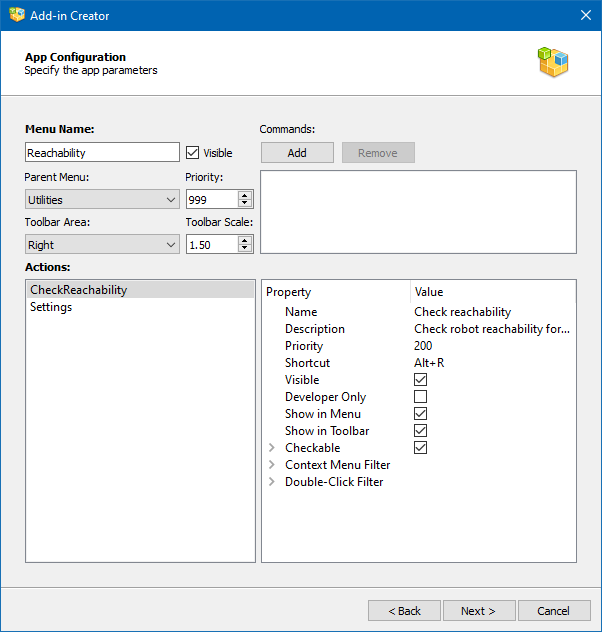
The parameters on this page define the contents of the AppConfig.ini file. Possible keys and values are listed on this page. Each App has its own menu and toolbar in RoboDK. The menu items and buttons on the toolbar are called Actions in App terms. You can define the conditions for displaying actions, their order in the menu and assign hotkeys to them.
The basic set of parameters include:
● Menu Name: Name of the entry in the main menu of RoboDK.
● Visible: Uncheck this checkbox to prevent the menu from being displayed in the main menu of RoboDK.
● Parent Menu: Select the main menu item for which the App child menu will be created or select Main to create a new main menu item.
● Priority: Set the priority that determines the order in which the menus of this App are displayed in relation to the menus of the other Apps (lower shows first).
● Toolbar Area: Position (side) on the main RoboDK window where the App toolbar will be located.
● Toolbar Scale: Proportion of toolbar icons in relation to the current size of RoboDK toolbar icons.
● Commands: RoboDK API commands that will be executed when the add-in is activated.
An action is created for each Python script that is in the same folder as the AppConfig.ini file. If the script is of an auxiliary nature, such an action can be suppressed using the Visible property.
The action properties are represented by the following list:
● Name: the name of the action as it appears in the menu and on the toolbar.
● Description: text of a tooltip when you hover the mouse pointer over a menu item or toolbar button.
● Priority: the order in which the action is displayed in relation to other actions of this App (lower shows first).
● Shortcut
● Visible
● Developer Only: this action will only be displayed if RoboDK is switched to developer mode (Ctrl+Alt+Shift+G).
● Show in Menu
● Show in Toolbar
● Checkable: create a checkable action, checkable actions can also be grouped by numbers.
● Context Menu Filter: defines the types of elements of the RoboDK tree for which this action will be added to the context menu.
● Double-Click Filter: defines the types of elements of the RoboDK tree for which this action will be called upon double clicking.
Creating your Add-in Package
The creation of the add-in is completed by building the RoboDK package as an RDKP file. This is the final step of creating your Add-in.
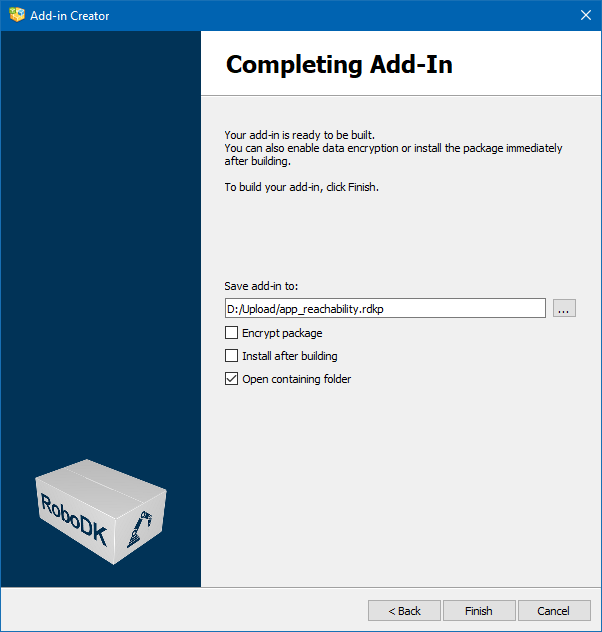
At the final stage, just before creating the package, the following options are available:
● Encrypt package: encrypt the file so that it can be easily sent by email, bypassing threat detection systems (Google mail services directly prohibit the transfer of executable files and Python scripts in attachments).
● Install after building: let the Add-in Manager to install the newly created package.
● Open containing folder: open the folder where the package was created.
Submit your Add-in
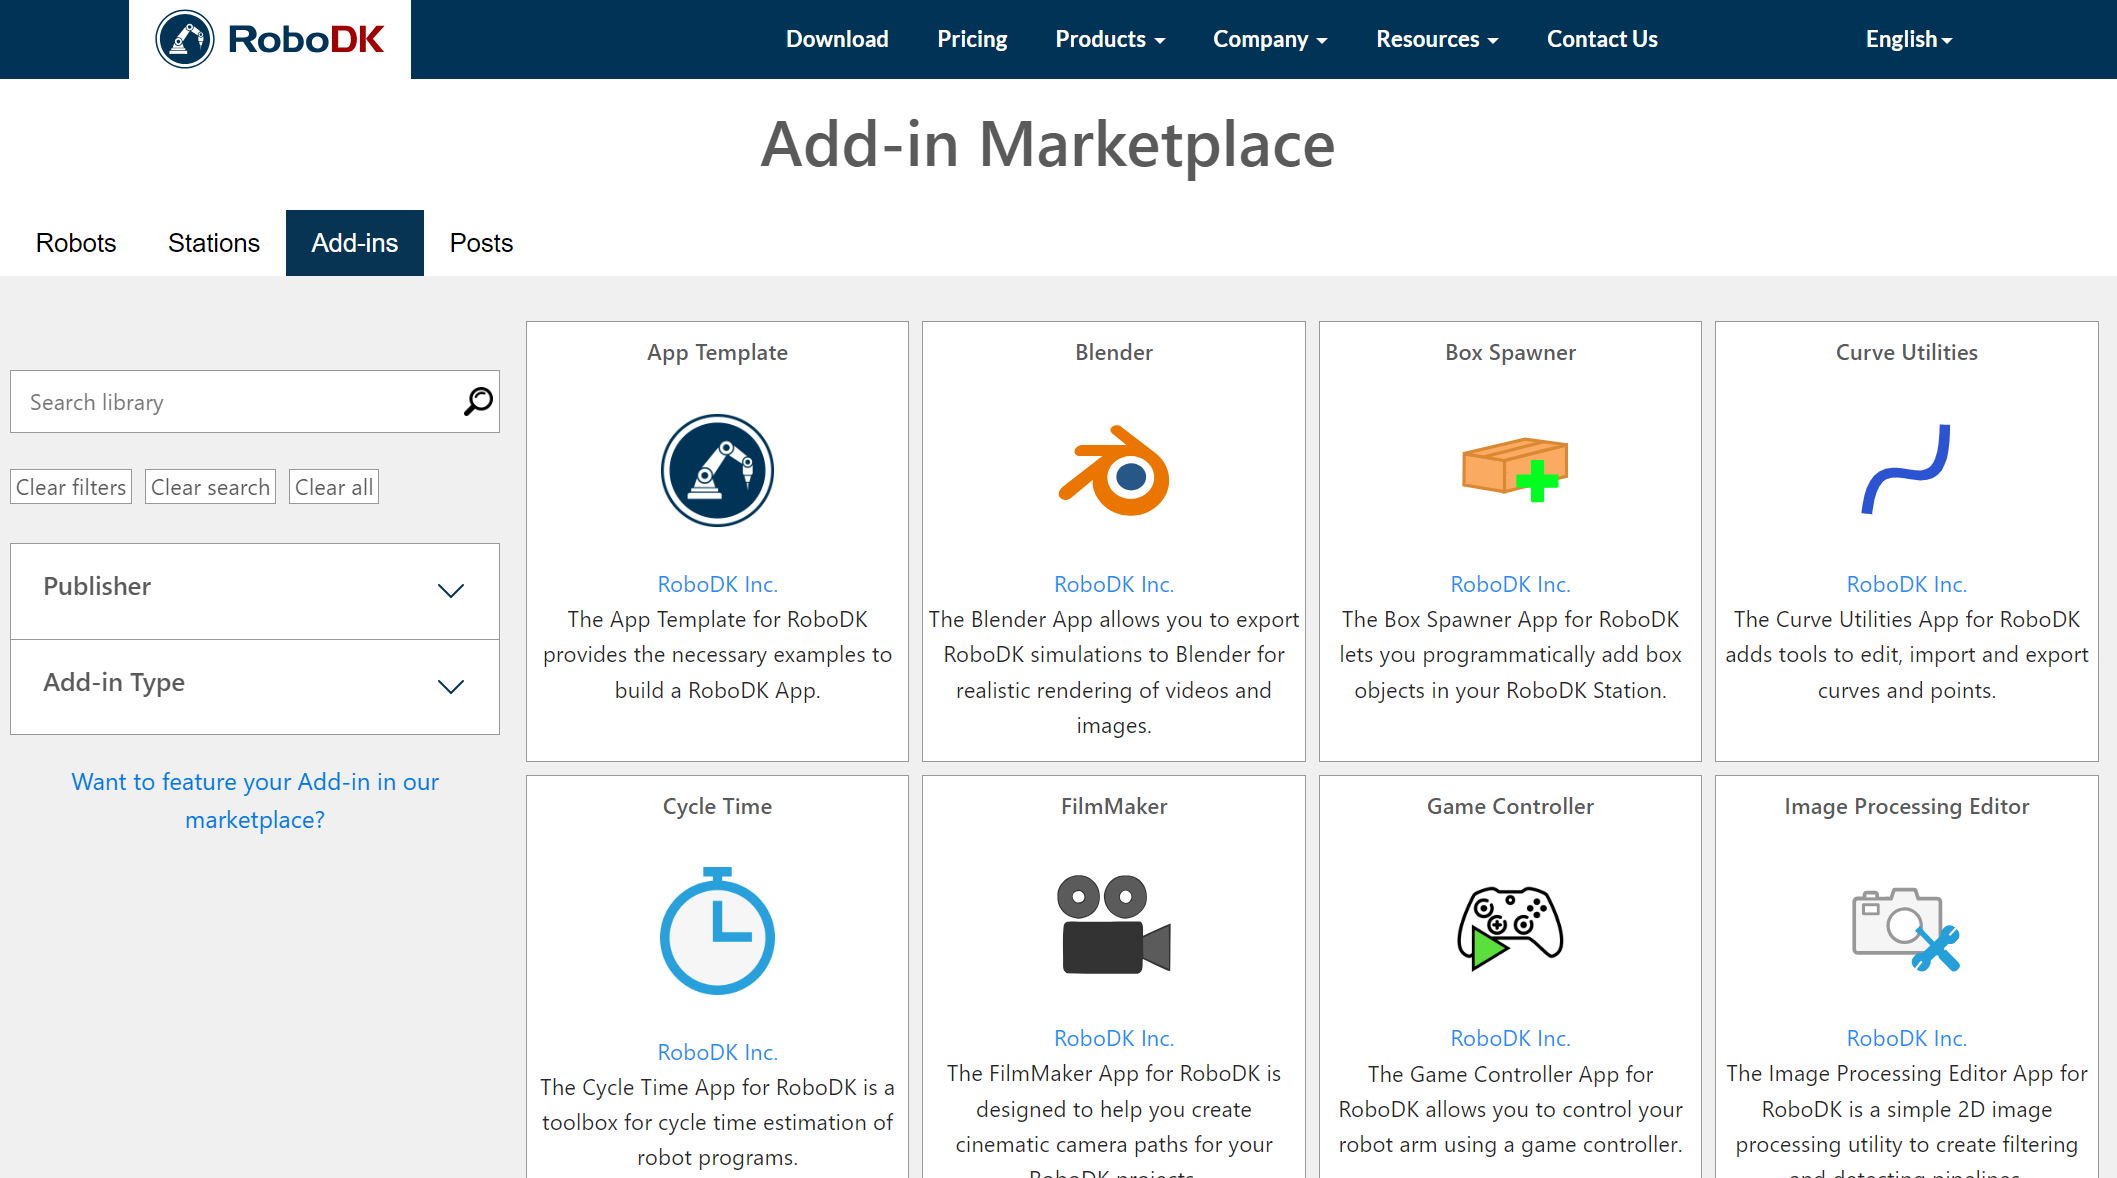
You can submit your RoboDK Add-in to be listed in the RoboDK Marketplace if you would like other RoboDK users to access to your Add-in. We welcome all submissions from external companies and developers.
You can choose to list your Add-In for sale or provide it for free. Both options will provide you with exposure about your company, products and services.
Contact us by email to submit your Add-in. Some of the information that will help RoboDK properly list your Add-In in the RoboDK Marketplace includes:
1.Description of your Add-In (readme file).
2.Manifest file, which includes additional information such as the website of the developer, and list price if applicable.
3.The RoboDK Add-in as a RoboDK package (RDKP file, created by the Add-in Creator).
4.At least one image or a screen recording that shows the functionality of your Add-in.
You can check RoboDK’s open-source Add-ins for examples on how to create the manifest files and what the result looks like in the RoboDK Marketplace. You can use the Add-In Manager to create and update your Manifest files.