Add-in Creator
The Add-in Creator allows you to easily create and modify RoboDK Add-in packages. The Add-in Creator tool is part of the Add-in Manager
The Add-in Creator can be opened by selecting Tools-Add-in Managerby and clicking on the Create Add-in button at the bottom of the Add-in Manager.
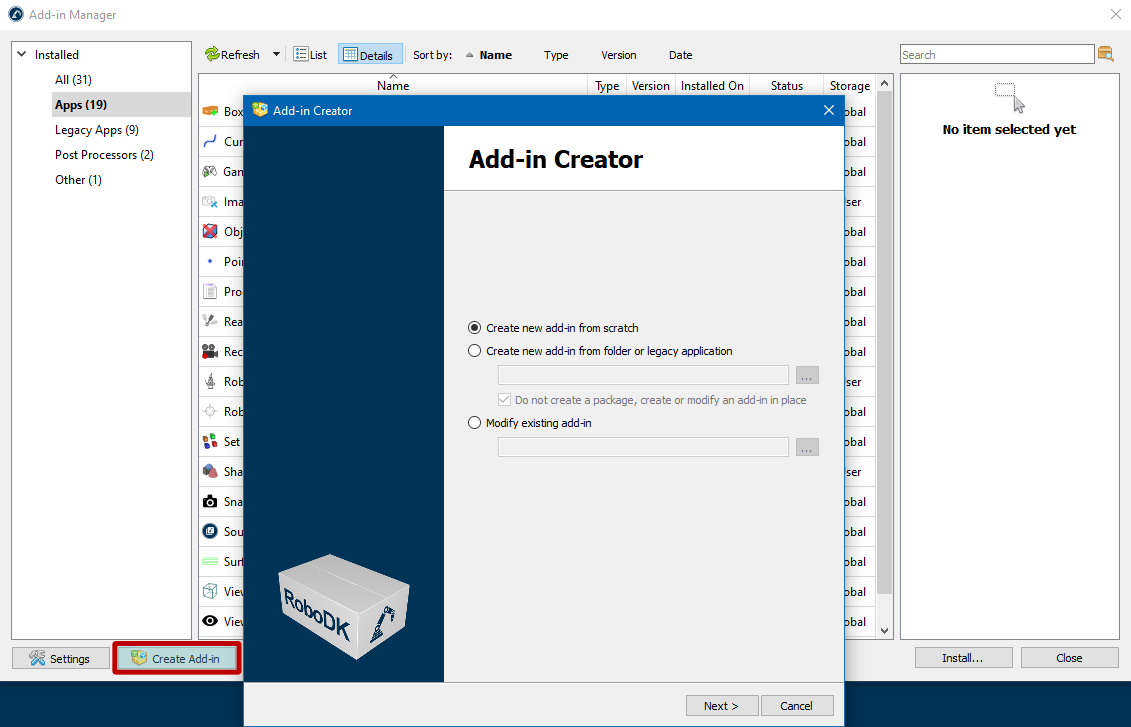
When you open the Add-in Creator wizard you can choose among the following options:
● Create new add-in from scratch: this will result in a new RoboDK package (RDKP file).
● Create new add-in from folder or legacy application: in this case you can specify the path to the folder where the files of your add-in are located. The Do not create a package option allows you to edit an add-in directly in the folder where it resides without creating a RoboDK package (RDKP file).
● Modify existing add-in: opens an existing RoboDK package to modify and create a new version.
Creating or editing Add-ins
You can easily create a new Add-in by entering basic information such as type, name, author information, etc.

In the Add-on Creator window, you’ll find mandatory fields in bold. There are five of them in total:
1.Type: The type of your Add-in, such as App, Robot Driver, Language, etc.
2.Name: The name of your add-in.
3.Unique Identifier: a unique identifier that belongs to this specific add-on. The checkbox next to this field allows you to activate the edit mode and set an arbitrary identifier, which can contain Latin letters, numbers and additional characters such as minus sign, dot, underscore.
domain.company.type.name. Although it is possible to use a different form of identifier, we recommend following the suggested format.4.Version: The version should be written in semantic versioning format (major.minor.patch).
5.Revision: The number of changes of the add-in, it takes numeric values from 1 and higher.
The remaining fields are optional, but allow you to give a more precise description of the add-in:
6.Author: The author's first and last name, or the name of your company or team (if there are multiple authors).
7.Company: The company name.
8.Language: The language used in the add-in. All languages from the IETF BCP 47 standard are listed.
9.Content Status: Status of the add-in, e.g. Final, Internal Testing, Beta, etc.
10.Description: Brief description of the add-in.
11.Modified by: This field can be used when someone modifies another author's add-in and wants to be mentioned as the author of the modifications.
12.Created: Date of creation of the first version of the add-in (to be filled in automatically).
13.Modified: Date of modification of the add-in (to be filled in automatically).
14.Email: E-mail address for sales, support or feedback purposes.
15.Website: The website of your company (developer of the Add-in).
16.Documentation Link: Link to the documentation of your Add-in.
17.Repository Link: For open-source Add-ins, a link to the GitHub repository or other public repository where the add-in is located.
18.Keywords: A list of keywords (tags) to simplify searching for the add-in in the Add-in Marketplace.
Adding assets to your Add-in
Add-in should contain one or more assets. Assets can be scripts and icons that will define the actions of your add-in.
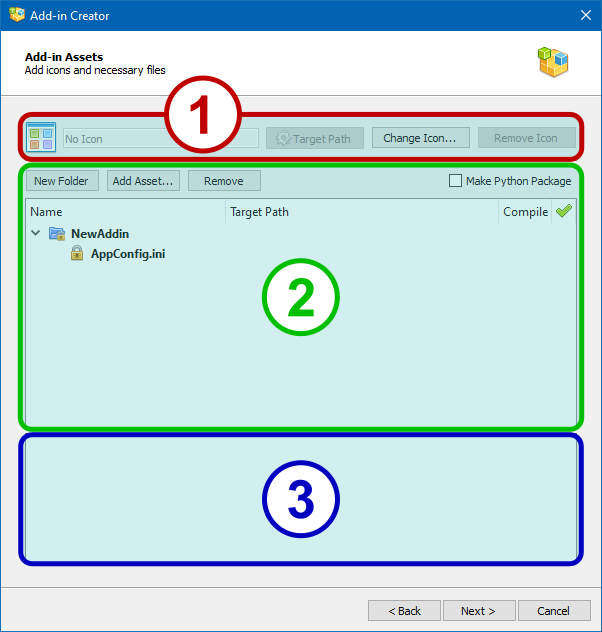
The Add-in Assets page is divided into three functional areas:
1.Package icon selection area.
2.File tree area.
3.Preview area for file contents.
The purpose of the buttons and the checkbox on this page:
● The TargetPath: Target Path button opens the properties window for the current icon file and allows you to set the target property (see the corresponding section on package internals).
● The Change icon… button allows you to replace the current package icon with a new one.
● The Remove Icon button deletes the current icon of the package and sets the default icon that corresponds to the type of the package being created.
● The New Folder button creates a new subfolder in the selected branch of the file tree.
● The Add Asset... button adds new files to the selected branch of the file tree.
● The Remove button removes the selected items from the file tree, except those that are locked.
● The Make Python Package checkbox adds the __init__.py file to the project so that the Python interpreter can use the project files as an externally loadable module.
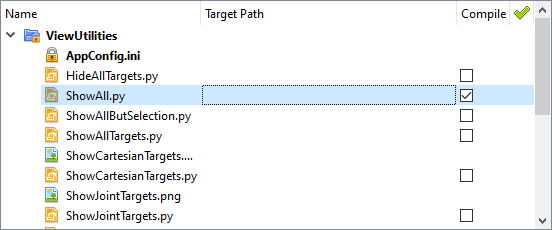
Python scripts can be marked up for later compilation into files with a .pyc extension. The compilation process will be displayed on the next page of the wizard.
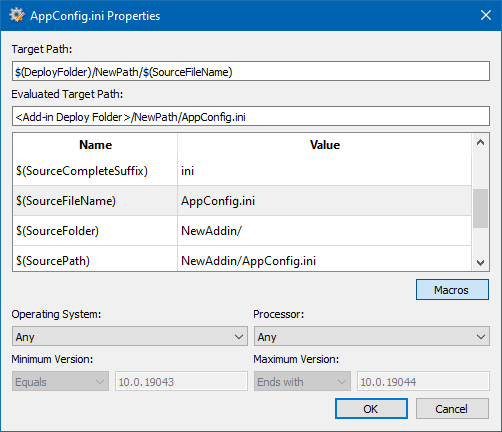
The Target Path field allows you to set the target property for each file. This can be done either manually, by typing the desired path and variable names, or by invoking the properties window when you click the gear button on the Target Path:

The file properties dialog box allows you to set the values of the target property and offers a convenient list of available variables. It also allows you to define the parameters of the target platform (OS type and version, CPU model) on which the file will be deployed.
Compiling Python scripts
The Python Compilation page will be opened if at least one Python script was selected for when you added your Add-in assets.
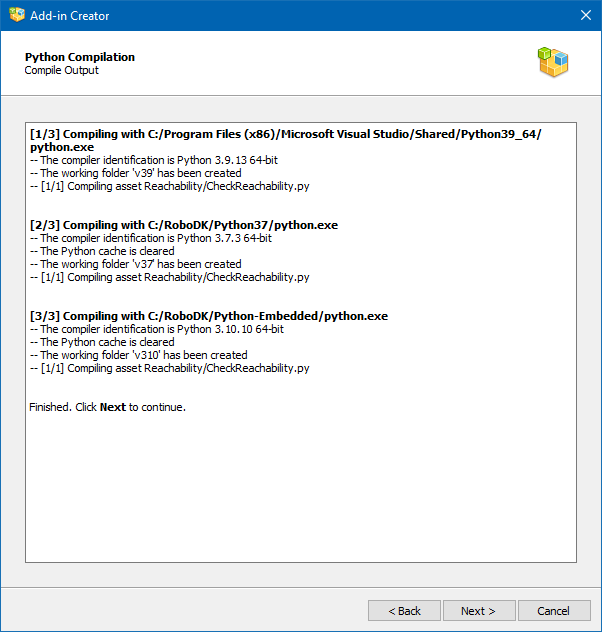
Compilation will be performed by all available Python interpreters. The list of available and used interpreters can be edited in the Add-in Manager Settings window. The compilation process itself requires no user intervention, and the page displays a detailed compilation log to catch potential problems.
App configuration
The App Configuration page allows you to customize how your actions or scripts are linked from the RoboDK user interface (menu and toolbar). You’ll see the App Configuration window if you are creating an Add-in of type App.
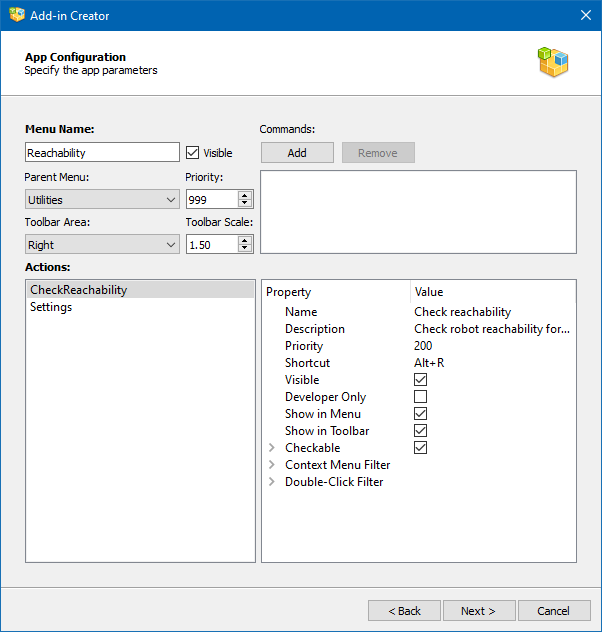
The parameters on this page define the contents of the AppConfig.ini file. Possible keys and values are listed on this page. Each App has its own menu and toolbar in RoboDK. The menu items and buttons on the toolbar are called Actions in App terms. You can define the conditions for displaying actions, their order in the menu and assign hotkeys to them.
The basic set of parameters include:
● Menu Name: Name of the entry in the main menu of RoboDK.
● Visible: Uncheck this checkbox to prevent the menu from being displayed in the main menu of RoboDK.
● Parent Menu: Select the main menu item for which the App child menu will be created or select Main to create a new main menu item.
● Priority: Set the priority that determines the order in which the menus of this App are displayed in relation to the menus of the other Apps (lower shows first).
● Toolbar Area: Position (side) on the main RoboDK window where the App toolbar will be located.
● Toolbar Scale: Proportion of toolbar icons in relation to the current size of RoboDK toolbar icons.
● Commands: RoboDK API commands that will be executed when the add-in is activated.
An action is created for each Python script that is in the same folder as the AppConfig.ini file. If the script is of an auxiliary nature, such an action can be suppressed using the Visible property.
The action properties are represented by the following list:
● Name: the name of the action as it appears in the menu and on the toolbar.
● Description: text of a tooltip when you hover the mouse pointer over a menu item or toolbar button.
● Priority: the order in which the action is displayed in relation to other actions of this App (lower shows first).
● Shortcut
● Visible
● Developer Only: this action will only be displayed if RoboDK is switched to developer mode (Ctrl+Alt+Shift+G).
● Show in Menu
● Show in Toolbar
● Checkable: create a checkable action, checkable actions can also be grouped by numbers.
● Context Menu Filter: defines the types of elements of the RoboDK tree for which this action will be added to the context menu.
● Double-Click Filter: defines the types of elements of the RoboDK tree for which this action will be called upon double clicking.
Creating your Add-in Package
The creation of the add-in is completed by building the RoboDK package as an RDKP file. This is the final step of creating your Add-in.
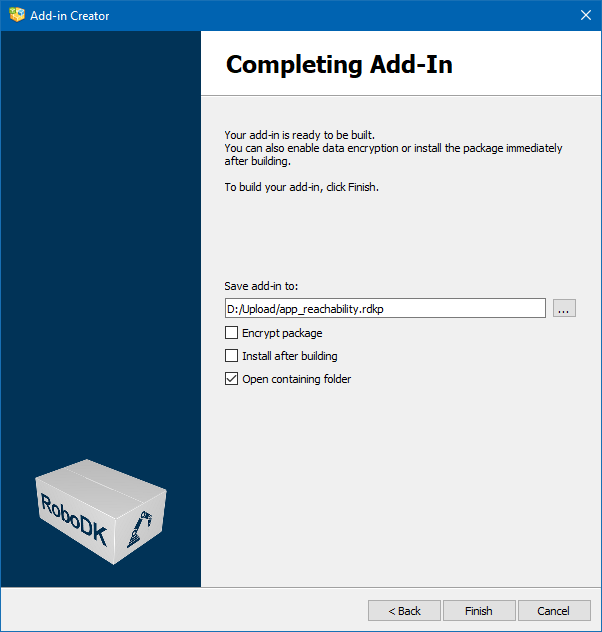
At the final stage, just before creating the package, the following options are available:
● Encrypt package: encrypt the file so that it can be easily sent by email, bypassing threat detection systems (Google mail services directly prohibit the transfer of executable files and Python scripts in attachments).
● Install after building: let the Add-in Manager to install the newly created package.
● Open containing folder: open the folder where the package was created.